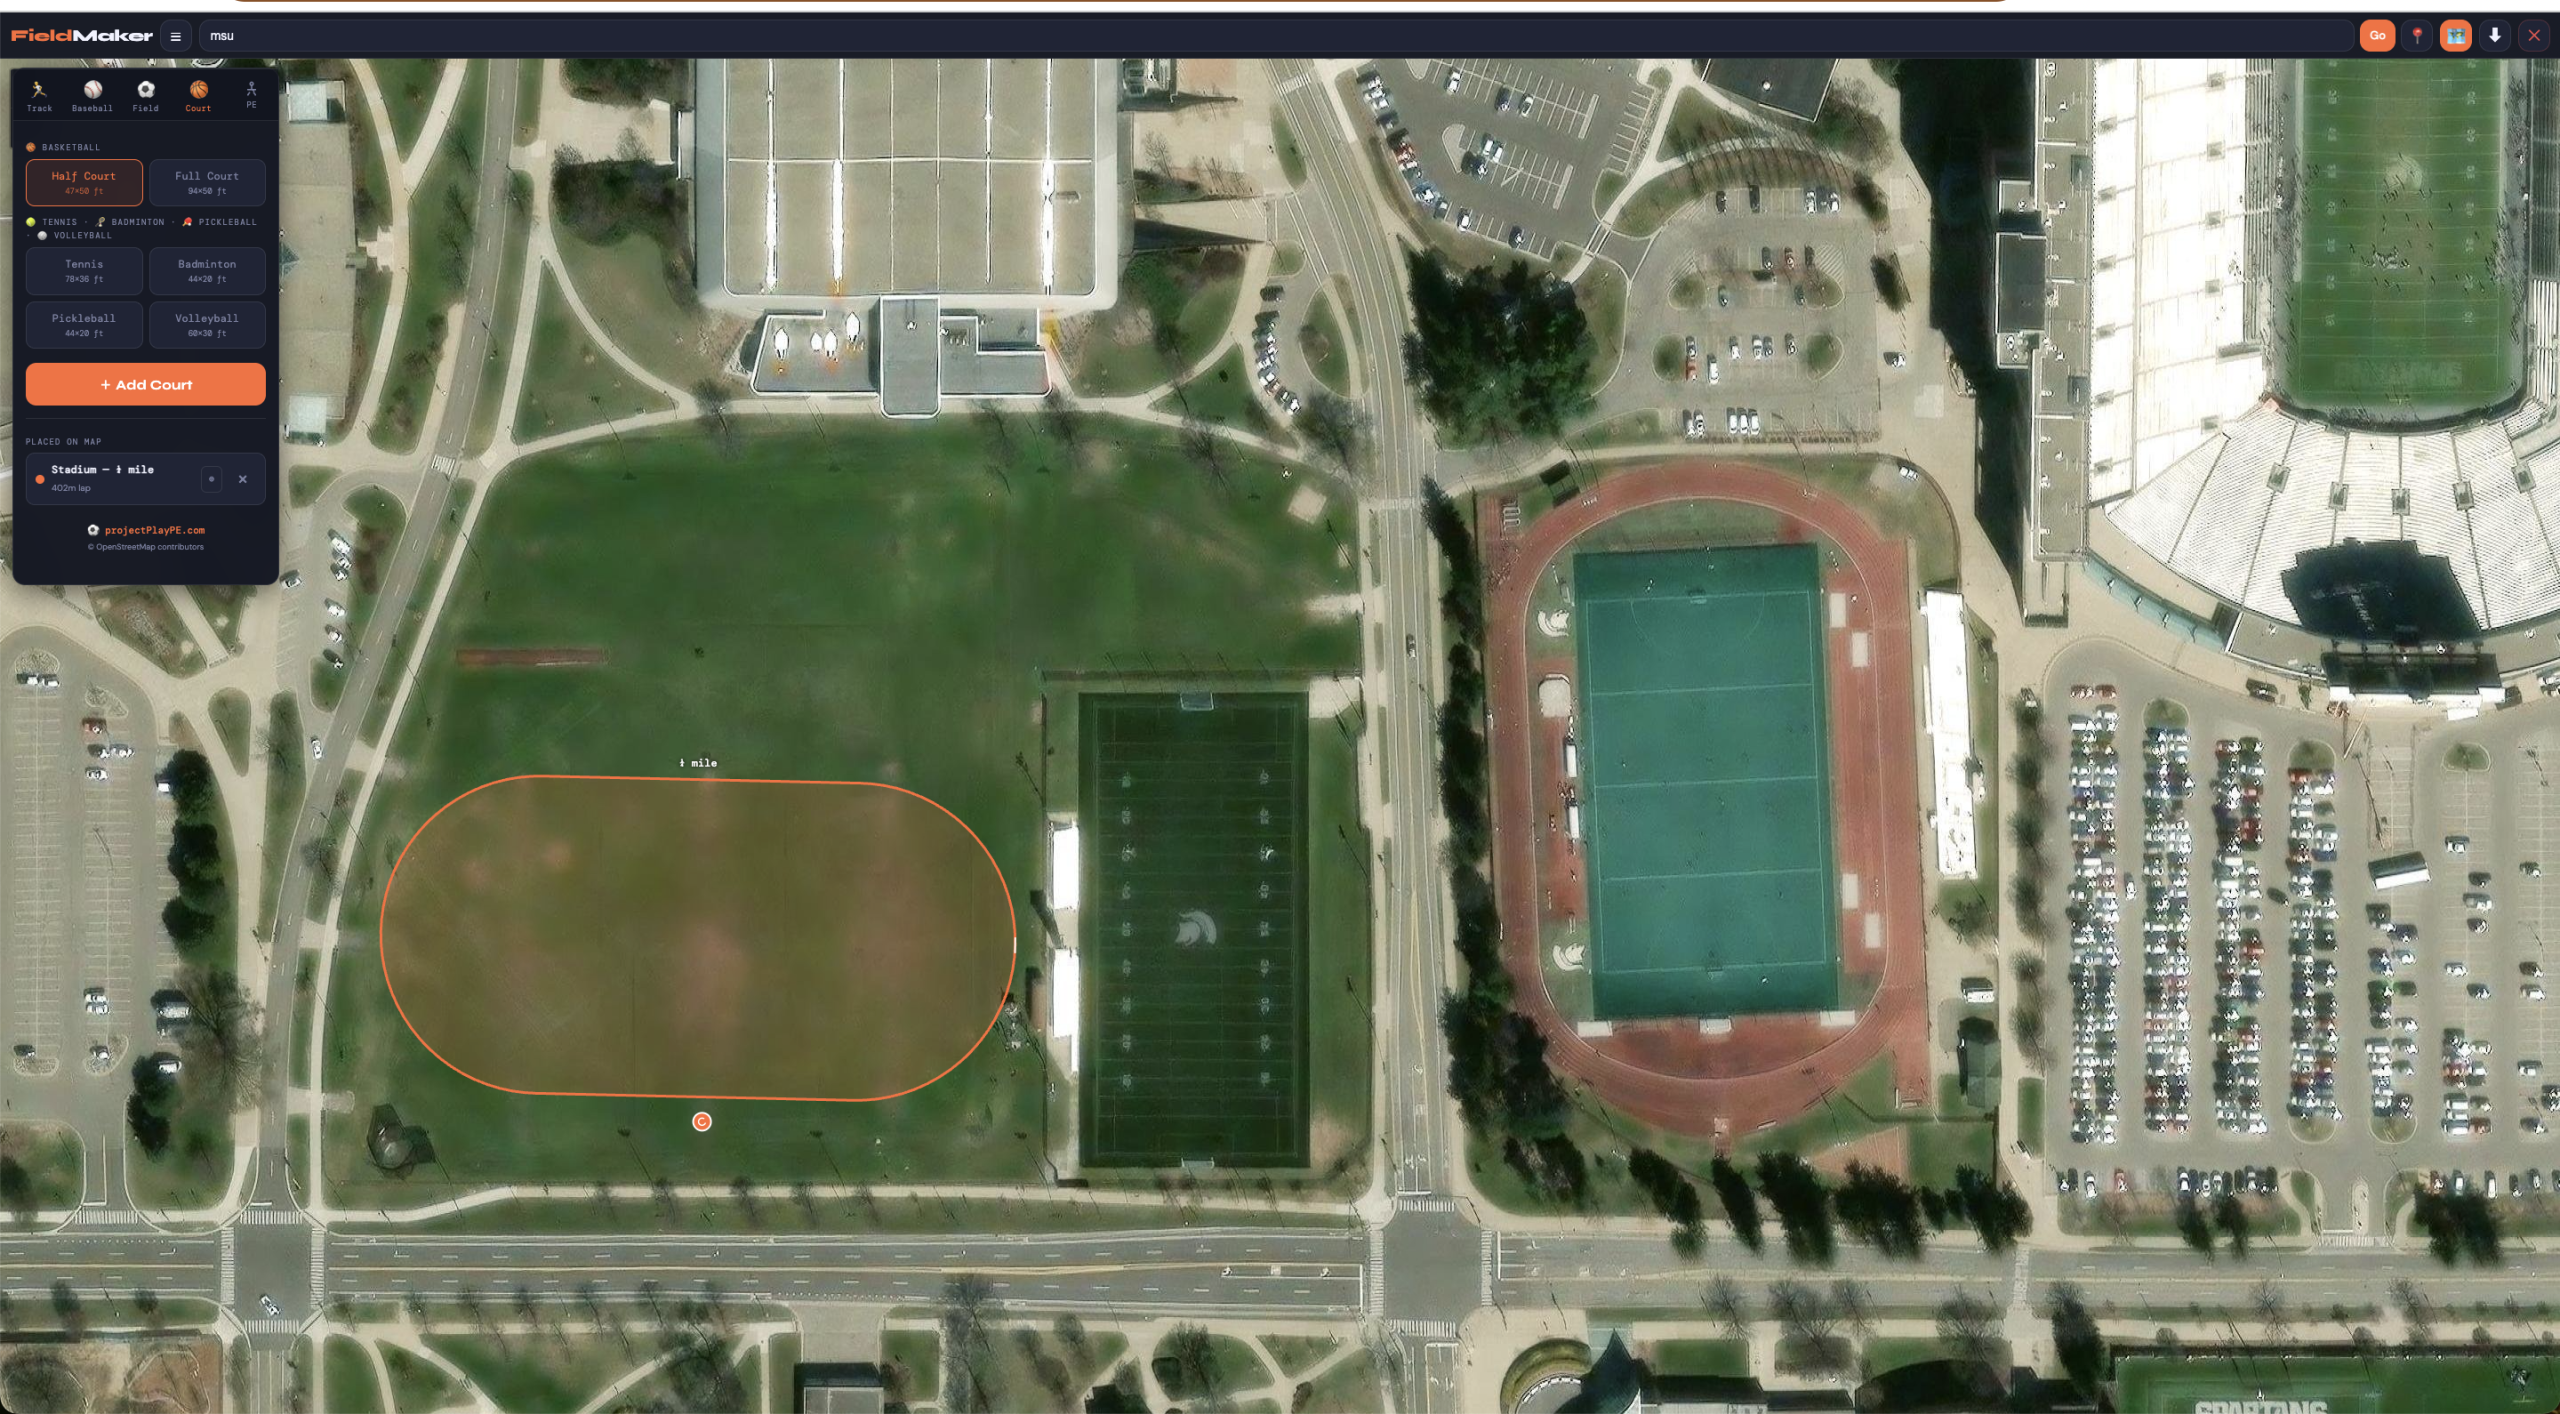
Escape Room

Escape Room Games – Teacher Guide

HTML Escape Room Games

These interactive movement-based escape rooms are designed for PE, health, and whole-group classroom fun. Students solve missions by scanning QR codes, typing commands, and completing movement challenges.

Game & Setup Links

Use the links below to launch each game or access the printable teacher setup pages.

Make sure all HTML files are in the same folder as this page for the links to work correctly.

How the games work

Each game opens in a browser and gives students a sequence of missions to complete. Students interact with the game by typing commands, scanning hidden QR codes, and finishing physical activity tasks. The goal is to complete all missions before time runs out.

Browser-based
QR code scavenger hunt
Movement challenges
25-minute timer
Great for PE stations or whole class play

Quick setup

1. Open the teacher setup page. Print the QR codes for the game you want to use. Cut them apart before class.
2. Hide the QR codes around your gym or classroom. Place them in safe, visible locations where students can move to find them.
3. Open the student game on a device. Use a laptop, Chromebook, or large display. A webcam is helpful for exercise challenges.
4. Review the basic commands with students. Students will type commands such as SCAN, EXERCISE, USE, ENTER, HINT, INVENTORY, and MISSIONS.
5. Start the game and coach as needed. Students work through each mission in order until they finish or the timer ends.

Student commands

SCANOpen the camera to scan a QR code
EXERCISEStart the current movement challenge
USE [item]Use an item collected from a QR code
ENTER [code]Submit a secret code when required
INVENTORYSee collected items
MISSIONSView mission progress
HINTGet help for the current mission
CLEARClear the terminal screen
πŸš€

Space Station NOVA

In this space-themed escape room, students save a damaged space station by restoring systems one mission at a time.

Mission flow

  1. Restore Power Core: find QR Code #1 and use the Power Cell.
  2. Fix Oxygen Leak: complete 15 jumping jacks.
  3. Repair Navigation: find QR Code #2 and enter the code NOVA7.
  4. Restore Communications: find QR Code #3 and use the Repair Kit.
  5. Launch Escape Pod: complete 10 push-ups.
Best for classes that enjoy a fast-paced sci-fi story and a mix of scavenger hunt plus exercise tasks.
πŸ¦’

Emergency Zoo Vet

In this animal-themed escape room, students help treat zoo animals by finding tools and completing animal movement challenges.

Mission flow

  1. Treat the Lion: find QR Code #1 and use the Vet Bag.
  2. Help the Frogs: complete 10 frog jumps.
  3. Calm the Chickens: complete 12 chicken dance flaps.
  4. Wake the Bears: complete 8 bear crawls.
  5. Save the Giraffe: find QR Code #2, use the Vaccine, then complete the heart-rate mission.
Great for younger learners because the animal theme and movement cues are easy to understand and fun to act out.

Heart-rate mission note for Zoo Vet

The final Zoo Vet mission can connect to a Bluetooth heart-rate monitor, but it also includes a manual-entry option. If Bluetooth is not available, students can exercise for about 30 seconds, count their pulse for 10 seconds, multiply by 6, and enter that number manually.

The default target is 120 BPM. If needed, that target can be lowered in the game file before use.

What teachers need

  • A device with a browser to run the game
  • Printed QR codes from the teacher setup page
  • Enough open space for safe movement
  • A webcam if you want students to use the built-in exercise tracking
  • An optional Bluetooth heart-rate monitor for the Zoo Vet final mission

Troubleshooting

  • If QR scanning does not work, check browser camera permissions first.
  • If exercise tracking is inconsistent, let students repeat the motion clearly and fully.
  • If webcam access is limited, you can still use the games by teacher-checking the movements manually.
  • If Bluetooth is unavailable for Zoo Vet, use the manual heart-rate entry option.
  • If students get stuck, have them type HINT or review the current mission together.

Best ways to use these games

  • Whole-class warm-up activity
  • PE station rotation
  • Indoor recess enrichment
  • Team-building challenge day
  • End-of-unit celebration activity
HTML Escape Room Games – Teacher Guide

Jumping Jacks


JUMP JACKS 5000 β€” User Guide

πŸ“· Webcam Required
⚑ Pose Detection
⭐ Fitness

JUMP JACKS 5000 ⭐

A webcam-based jumping jack assessment tool that uses pose detection to count reps and score form quality in real time. Students perform 10 seconds of jumping jacks while the tool automatically tracks every rep β€” detecting whether arms are high, feet are wide, and the whole movement is coordinated. A live rep counter, instant form feedback, and slow-motion replay make it a perfect self-managed fitness station.

⭐
Fitness
πŸ”’
Rep Count
πŸ€–
Auto-Assess
πŸ“Ή
Replay

How to Use

  • πŸ’» Open JUMP JACKS 5000 on a laptop or tablet
  • πŸ“· Allow webcam access when prompted
  • 🟒 Wait for POSE ONLINE to appear in the header
  • πŸ‘Ÿ Student stands facing the camera with feet together
  • ▢️ Press READY to start the countdown
  • ⭐ Student performs jumping jacks on GO!
  • ⏱ 10-second window β€” rep counter updates live on screen
  • βœ… Each rep marked βœ“ good or βœ— fix form in real time
  • πŸ“Ί 50% slow-motion replay shows the full set automatically

πŸ”’

Rep-Based Scoring β€” Different From the Other Tools

Unlike SET IT 5000 and THROW IT 5000 which score a single skill attempt, JUMP JACKS 5000 scores every rep across a 10-second window. The result shows Good Reps out of Total Reps (e.g. 8/10) with a percentage β€” so students can see not just how many they did, but how many they did well. This makes it ideal as a fitness station where students can try to beat their own score.

What Gets Assessed

Each rep is split into two phases β€” the tool must confirm both before counting it as a completed repetition

↑ UP Phase β€” Arms & Feet Out
πŸ™Œ

Arms Overhead

Both wrists must reach clearly above the nose β€” not just shoulder height.

Wrist Y vs Nose Y

↔️

Arms Wide

Both wrists must extend out beyond the shoulders β€” not just raised straight up.

Wrist X vs Shoulder X

🦡

Feet Wide

Ankle span must reach at least shoulder width β€” no tiny hops with feet barely apart.

Ankle Span vs Shoulder Span

↓ DOWN Phase β€” Arms & Feet Back
⬇️

Arms Down

Both wrists must return to hip level β€” completing the full range of motion.

Wrist Y vs Hip Y

πŸ‘Ÿ

Feet Together

Both ankles must return close together β€” not staying wide between reps.

Ankle X Distance

Each phase requires several consecutive frames to confirm β€” a partial movement or stumble won’t accidentally count as a rep.

What Students See Live

Real-time feedback keeps students engaged and self-correcting throughout the 10 seconds

πŸ”’

Live Rep Counter

A large good-rep count displays on the video feed, updating after every completed rep so students can track their score in the moment.

βœ“ βœ—

Instant Form Flash

After each rep, a βœ“ GREAT! or βœ— FIX FORM flashes on screen β€” immediate feedback without stopping the set.

🟒

Rep History Dots

The side panel fills with green βœ“ and pink βœ— dots β€” one per rep β€” so students and teachers can see the pattern at a glance after the set.

⏱

Countdown Timer Bar

A bar along the bottom of the screen counts down 10 seconds, shifting from lime to yellow to pink as time runs out β€” students always know how long is left.

🦴

Skeleton Overlay

A full-body skeleton is drawn over the live video so students can confirm they are being detected before pressing READY.

↑↓

Phase Indicator

The side panel shows whether the tool is waiting for the UP or DOWN phase β€” useful for teachers watching from the side to understand what the tool is tracking.

Setup Guide

Works great as a self-managed station β€” students can run it independently once set up

1

Position Your Device

Place a laptop or tablet on a table or chair at roughly hip height. The camera needs a clear front-on view of the student from head to toe β€” the full arm swing and foot spread must both be visible. Leave enough space on either side for the arms to reach out wide.

πŸ’‘ Landscape orientation only

2

Wait for Pose Engine & Check the Skeleton

After opening the tool and allowing camera access, wait for ● POSE ONLINE to appear in the header. A white skeleton will appear over the student’s body confirming they are being detected. The READY button unlocks automatically.

πŸ’‘ First load takes ~10–15 seconds

3

Student Gets in Starting Position

The student stands on the foot guide shown on screen, facing the camera with feet together and arms at their sides. Their full body from feet to raised hands must be visible β€” this is the starting position for a jumping jack.

πŸ’‘ 6–8 feet from camera works well for most students

4

Press READY & Go on Cue

Press the READY button to start the 3-2-1 countdown. On GO! the student begins jumping jacks. The tool records and analyses 10 seconds of movement, updating the rep counter and form feedback after every completed rep.

πŸ’‘ Students can press READY themselves once they know the routine

5

Review the Replay & Rep History

After 10 seconds the video plays back at 50% speed automatically. The side panel shows the final good rep count, total reps, and a dot for every rep. Students can use the history dots to identify where form broke down β€” typically the last few reps as they tire.

πŸ’‘ Press TRY AGAIN to immediately attempt another set and try to beat the score

Scoring & Ratings

Rated by percentage of good-form reps out of total reps completed

100%
πŸ† Jumping Superstar!
Every rep with full correct form β€” and at least 5 reps completed

80%+
⚑ Awesome Jumps!
Mostly great form β€” one or two reps to tighten up

60%+
πŸŒ€ Getting There!
Form is developing β€” focus on full arm reach and wide feet

Under 60%
πŸ’Ύ Keep Practising!
Use the slow-motion replay and rep dots to spot where form breaks down

πŸ’‘ Teacher Tips

  • πŸ”„ Run as a self-managed station β€” once students know the routine they can press READY, perform their set, watch the replay, and rotate to the next station without teacher involvement
  • πŸ“Ί Connect to a TV or large monitor so the group can watch the slow-motion replay together β€” use the rep history dots to discuss where form broke down
  • πŸ† Use it as a personal best challenge β€” students record their good rep score and try to improve it across the unit, making it a simple built-in fitness benchmark
  • πŸ”’ Remind students that the goal is good reps, not just fast reps β€” rushing tends to drop form and actually reduces their score
  • πŸ“ Students need enough space on either side to fully extend their arms β€” check the skeleton overlay confirms both wrists are visible at full reach before starting
  • β˜€οΈ Avoid direct sunlight behind the student β€” consistent, even lighting gives the pose engine the best chance of tracking the full arm and leg movement accurately
  • πŸ”‹ Keep the device plugged in β€” pose detection is CPU intensive and will drain battery quickly during a full lesson

Launch JUMP JACKS 5000

Opens in a new tab β€” allow camera access and press READY when in position.

ClassPulse


ClassPulse β€” User Guide

❀️ Heart Rate
πŸ“‘ Bluetooth
πŸ”΄ Live Dashboard

ClassPulse ❀️

A real-time heart rate lab tool for PE class. Students connect a Bluetooth heart rate armband, pick an activity, and their live BPM syncs to the teacher’s dashboard β€” all in a browser, no app install needed. Zones are automatically personalized by grade.

πŸ“‘
Bluetooth HR
🍎
Dashboard
πŸ‹οΈ
HIIT Timer
πŸ“Š
Lab Report

Quick Start

  • πŸ’» Each student opens ClassPulse in Chrome on their own Chromebook
  • 🍎 Teacher opens ClassPulse β†’ I’m a Teacher β†’ Create Class
  • πŸ”’ Teacher shares the 4-letter class code with students
  • 🎽 Students tap I’m a Student, enter name, grade, and code
  • πŸ“‘ Students tap Bluetooth Device and select their armband
  • πŸƒ Students pick an activity and tap Start
  • πŸ“Ί Teacher projects the dashboard β€” live BPM appears for every student
  • 🎯 No class code? Leave it blank to track in Solo mode

πŸ“±
iOS App
Coming Soon
β€” Native Bluetooth support for iPhone

πŸ’»

Device Requirement β€” One Chromebook Per Student

ClassPulse uses Web Bluetooth, which requires Google Chrome on a Chromebook or Android device. Each student needs their own device β€” Bluetooth heart rate monitors can only pair to one device at a time. iOS and Safari are not currently supported (iOS app coming soon).

Teacher & Student Roles

ClassPulse has two separate modes β€” here’s what each role does

🍎

Teacher Dashboard

Create a class with a 4-letter code. See every student’s live BPM, zone, and activity on a projected dashboard. Broadcast messages, lock the class once everyone’s in, and export session data to CSV.

PIN Protected

🎽

Student Tracker

Enter name, grade, and class code. Connect a Bluetooth armband. Pick an activity or build a HIIT workout. Track live BPM and zones, then complete a lab report with reflection questions at the end.

Solo Mode Available

πŸ“£

Broadcast Messages

Send instant pop-up messages to all connected student devices β€” Switch Activity, Get Water, Stop & Rest, Check Zone β€” or type a custom message from the dashboard.

Live Sync

πŸ‹οΈ

HIIT Workout Builder

Students can build a custom HIIT session instead of a single activity β€” choose exercises, set work/rest timing, and track heart rate through every round with a live countdown timer.

Custom Intervals

Step-by-Step Guide

Follow the steps for your role β€” teacher and student guides side by side


1

Set Your Teacher PIN

The first time you tap I’m a Teacher, you’ll create a PIN. This protects the dashboard from students. If you forget it, tap “Forgot PIN? Reset it” on the PIN screen.

πŸ’‘ PIN is stored on your device β€” choose something memorable

2

Create a Class

Tap Create New Class. A random 4-letter code is generated (e.g. AB12). Write it on the board or project it β€” students need this to join.

πŸ’‘ Tap “Lock Class” once all students have joined to block latecomers

3

Project the Dashboard

Connect to a TV or projector. The dashboard shows every student’s name, live BPM, heart rate zone, activity, and a mini sparkline. A red bar at the top of a card means the student is at Max Effort β€” check on them.

πŸ’‘ Filter by zone using the 😴 🚢 πŸƒ πŸ’ͺ πŸ”₯ buttons

4

Broadcast & Export

Use the broadcast bar to send quick messages (Water Break, Stop & Rest, etc.) or type a custom message. After the session, tap ↓ Export to download a CSV with all student data including grade-adjusted zone breakdowns.

πŸ’‘ Dashboard updates every 3 seconds

1

Open ClassPulse in Chrome

Open the ClassPulse link in Google Chrome on your Chromebook. Tap I’m a Student to begin.

πŸ’‘ Must use Chrome β€” not Safari, Firefox, or Edge

2

Enter Your Details

Type your name and select your grade. Your grade is used to calculate your personal heart rate zones based on your estimated max heart rate. Then enter the 4-letter class code from your teacher β€” or leave it blank to go Solo.

πŸ’‘ Solo mode tracks your data locally β€” nothing goes to the dashboard

3

Connect Your Armband

Make sure your armband is on and powered up. Tap πŸ“‘ Bluetooth Device β€” Chrome shows a list of nearby devices. Select your armband. The button turns green when connected.

πŸ’‘ Optical armbands: place 2–3 finger widths above the elbow, snug but not tight

4

Pick an Activity & Start

Choose your activity from the list, then tap πŸš€ Start!. Or tap πŸ‹οΈ Build a HIIT Workout to set up a custom interval session with rounds, work time, and rest time.

πŸ’‘ Your BPM syncs live to the teacher’s dashboard every 3 seconds

5

Complete Your Lab Report

Tap β–  Stop when done. Your summary shows duration, average BPM, max BPM, time in each zone, and a full HR graph. Answer the three reflection questions, then download your CSV or print your report.

πŸ’‘ Tap πŸƒ Try Another Activity to start a new session

Heart Rate Zones

Automatically calculated from your grade using the Tanaka formula (208 βˆ’ 0.7 Γ— age) β€” a 6th grader and a 12th grader get different BPM cutoffs for the same zone

😴
Resting
< 50% MAX HR
Taking it easy. Recovery or standing still.

🚢
Light
50–60% MAX HR
Warming up. Easy and sustainable.

πŸƒ
Aerobic
60–80% MAX HR
Cardio sweet spot. Breathing hard but talking.

πŸ’ͺ
Anaerobic
80–90% MAX HR
Very hard. Lactic acid building up fast.

πŸ”₯
Max Effort
90–100% MAX HR
All out. Can’t hold for more than a minute.

Compatible Heart Rate Monitors

Any Bluetooth LE monitor using the standard Heart Rate Profile (HRP) β€” if it works with Garmin, Wahoo, or Strava it will work with ClassPulse

Scosche ⭐
Rhythm+ 2.0, Rhythm 24
Optical armband β€” recommended for PE

Polar ⭐
OH1, OH1+, Verity Sense
Optical armband β€” ideal for class sets

Polar
H9, H10
Chest strap

Wahoo
TICKR, TICKR X, TICKR Fit
Chest strap / armband

Garmin
HRM-Dual, HRM-Pro
Chest strap

CooSpo / Magene
H808S, HW807, H64
Budget chest strap β€” great for class sets

πŸ’‘ Teacher Tips

  • πŸ”’ Lock the class once all students have joined to prevent others from entering mid-session
  • πŸ“Ί Connect your teacher device to a TV or projector β€” the dashboard is designed to be read from across a gym
  • πŸ”‹ Keep devices plugged in during class β€” Bluetooth and live sync drain batteries quickly
  • πŸ“‘ If a student’s armband won’t appear in Chrome’s list, check it isn’t already connected to another Chromebook
  • 🎯 No armbands yet? Students can use Demo Mode (simulated HR) for practice before the real monitors arrive
  • πŸ“Š The CSV export includes each student’s grade-adjusted zone breakdowns β€” ready to paste into a gradebook

See It In Action

A full walkthrough of ClassPulse β€” teacher setup, student join, live dashboard, and lab report

❀️
β–Ά
WATCH WALKTHROUGH
ClassPulse Overview


Launch ClassPulse

Opens in a new tab β€” each student and the teacher opens their own copy in Chrome.

Gymnastics Scale


SCALE IT 5000 β€” User Guide

πŸ“· Webcam Required
⚑ Pose Detection
⭐ Gymnastics

SCALE IT 5000 ⭐

A webcam-based gymnastics scale assessment tool that uses pose detection to evaluate a student’s arabesque balance in real time. Students stand on one leg and lift the other behind them while the tool checks four key form elements continuously. A live hold timer counts every second they maintain correct form β€” with difficulty levels so the same tool works for beginners and more advanced students alike.

⭐
Balance
⏱
Hold Timer
πŸ€–
Auto-Assess
πŸ“Ή
Replay

How to Use

  • πŸ’» Open SCALE IT 5000 on a laptop or tablet
  • πŸ“· Allow webcam access when prompted
  • 🟒 Wait for POSE ONLINE to appear in the header
  • 🎚 Pick a difficulty: EASY 2s, MED 4s, or HARD 6s
  • πŸ‘Ÿ Student stands facing the camera on two feet to start
  • ▢️ Press READY to start the countdown
  • ⭐ On GO! student lifts one leg behind into scale
  • ⏱ Hold timer counts up while all four checks are good
  • 🌟 Screen flashes when the goal time is reached
  • πŸ“Ί 50% slow-motion replay plays automatically

🎚 Pick a Difficulty β€” Same Tool, Three Levels

🟒
EASY
2s
First-timers and younger students

🟑
MEDIUM
4s
Standard gymnastics hold target

πŸ”΄
HARD
6s
Strong balance students pushing for mastery

Students who exceed their selected goal can keep holding β€” the tool tracks their best hold time across the whole 15-second window, so beating the target earns a higher rating.

⏱

How the Hold Timer Works

The timer only counts up while all four form checks are passing at the same time. If the student wobbles, drops their leg, or bends a knee, the timer snaps back to 0 and waits for them to correct. The best hold of the 15-second window is what gets scored β€” so students can try, wobble, reset, and try again for a better time without penalty.

See It In Action

Watch how BUMPTRON 5000 works in a real PE setting

β–Ά Demo Video

What Gets Assessed

4 form elements checked continuously β€” the lifted leg is auto-detected, so students can use either leg as the standing leg

🦡

Standing Leg Straight

The leg on the ground must be nearly locked β€” knee angle of 160Β° or greater. Bent standing legs are the most common balance fault.

Hip–Knee–Ankle Angle

⬆️

Leg Lifted High

The back ankle must be raised clearly above the back hip β€” not just peeled off the floor but lifted into a proper arabesque height.

Back Ankle vs Back Hip Y

πŸ“

Lifted Leg Straight

The back leg must be nearly locked at the knee β€” angle of 155Β° or greater. A straight line from hip to toe is the hallmark of a clean scale.

Back Leg Knee Angle

β†˜οΈ

Hinged Forward

The torso must lean forward so the shoulders drop close to hip level β€” the forward hinge is what creates the classic arabesque line.

Shoulder Y vs Hip Y

Setup Guide

Works as a quiet balance station β€” requires a clear floor space and a side-on camera angle

1

Position Your Device Side-On

Place a laptop or tablet on a chair or table at roughly hip height, positioned so the student will be sideways to the camera. This angle is essential β€” front-on does not show the back leg lift or forward hinge properly. The student’s whole body, from head to raised foot, must fit in the frame.

πŸ’‘ Side-on camera angle is critical for this tool

2

Clear Floor Space

Leave about 6 feet of open space around the student β€” the back leg extends well behind them and the forward hinge brings the upper body forward. Crash mats or gym mats under the student are a good idea for students who may wobble out of the hold.

πŸ’‘ Soft surface underneath helps with confidence

3

Wait for Pose Engine & Pick a Difficulty

Wait for ● POSE ONLINE to appear in the header and the skeleton overlay to show up on the live video. Then tap EASY, MED, or HARD in the header to set the hold-time goal.

πŸ’‘ Difficulty can be changed between students with one tap

4

Student Gets Into Starting Position

The student stands sideways on two feet, facing across the camera’s view. They can choose either leg as their standing leg β€” the tool auto-detects which leg is lifted and adjusts the checks accordingly. Arms can be out to the sides or forward, whatever feels most balanced.

πŸ’‘ Arm position is not checked β€” any comfortable position is fine

5

Press READY & Hold on Cue

Press READY to start the countdown. On GO! the student lifts one leg behind into a scale. A hold timer appears on the video β€” it counts up while all four checks are passing and resets to 0 if form breaks. Students have a 15-second window to achieve their best hold.

πŸ’‘ Wobbles are fine β€” just reset the pose and keep trying for a best time

6

Review the Replay & Best Hold

After 15 seconds the video plays back at 50% speed automatically. The side panel shows the best hold time achieved. The slow-motion replay makes it easy to spot exactly when form broke β€” a bent standing leg, a dropping back leg, or a lifted torso.

πŸ’‘ Press TRY AGAIN to immediately attempt another hold

Scoring & Ratings

Ratings are based on actual hold time, not the selected difficulty β€” so exceeding the goal always earns a higher rating

6s+
πŸ† Balance Legend!
Held clean form for 6 seconds or more β€” full Hard-level mastery

4–6s
⚑ Steady Statue!
Solid Medium-level hold with strong balance control

2–4s
πŸŒ€ Nice Balance!
Clean Easy-level hold β€” ready to push for Medium

Under 2s
πŸ’Ύ Keep Practising!
Use the slow-motion replay to spot where form breaks down

πŸ’‘ Teacher Tips

  • πŸ”„ Run as a self-managed station within a gymnastics circuit β€” one device handles a rotation while other students work on tumbling, rolls, or mat skills at separate stations
  • πŸ“Ί Connect to a TV or large monitor so the group can watch the slow-motion replay together β€” great for peer feedback and coaching discussion
  • 🎚 Start every student on Easy and let them progress through the levels β€” completing all three difficulties across a unit makes a satisfying personal challenge
  • 🧘 Remind students to pick a spot on the wall to stare at β€” fixed gaze is the single biggest factor in extending balance hold times
  • πŸ“ Emphasise slow lifts rather than quick snaps β€” students who move slowly into position hold significantly longer than those who rush
  • β˜€οΈ Avoid direct sunlight behind the student β€” consistent even lighting helps the pose engine track the back leg cleanly against the background
  • πŸ”‹ Keep the device plugged in β€” pose detection is CPU intensive and will drain battery quickly during a full lesson

Launch SCALE IT 5000

Opens in a new tab β€” allow camera access, pick a difficulty, and press READY when in position.

Overhand Throw


THROW IT 5000 β€” User Guide

πŸ“· Webcam Required
⚑ Pose Detection
🎯 Throwing

THROW IT 5000 🎯

A webcam-based overhand throwing assessment tool that uses pose detection to automatically analyse a student’s throwing technique in real time. Students throw on command, the tool detects key form elements frame by frame β€” then an instant slow-motion replay lets them see exactly what they did well.

🎯
Throwing
πŸ“
Technique
πŸ€–
Auto-Assess
πŸ“Ή
Replay

How to Use

  • πŸ’» Open THROW IT 5000 on a laptop or tablet
  • πŸ“· Allow webcam access when prompted
  • 🟒 Wait for POSE ONLINE to appear in the header
  • βœ‹ Select RIGHT or LEFT arm in the header toggle
  • πŸ‘Ÿ Student stands sideways to camera in the marked position
  • ▢️ Press READY to start the countdown
  • 🎯 Student throws on the GO! cue
  • 🎬 4-second recording captures the throw
  • πŸ“Ί 50% slow-motion replay plays automatically
  • βœ… Checklist lights up green for each skill detected

βœ‹

Left & Right Hand Support

Use the RIGHT / LEFT toggle in the header to match the student’s throwing arm before starting. This flips all detection logic β€” including which foot should stride forward and which arm to track for elbow height, ball cock, and follow-through. The throwing arm skeleton is highlighted in cyan on screen so students can see exactly what the tool is watching.

What Gets Assessed

4 technique elements are automatically detected using body landmarks β€” no teacher input needed during the throw

πŸ‘Ÿ

Step Forward

The opposite foot must step forward β€” a right-handed thrower leads with the left foot, and vice versa. This is the foundation of rotational throwing power.

Stride Foot Position

πŸ”Ό

Elbow Up

The throwing elbow must reach at or above shoulder height during the wind-up. Dropping the elbow is the most common error in developing throwers.

Elbow vs Shoulder Height

🀜

Ball Back

The throwing wrist must cock behind the head with the elbow bent between 55Β° and 145Β°. This loads the arm for a powerful release rather than a pushing motion.

Wrist Position + Elbow Angle

⬇️

Follow Through

After release, the throwing arm must swing down and across the body past the midline β€” completing the kinetic chain and protecting the arm from strain.

Wrist Crosses Midline

Setup Guide

Ready to go in under 3 minutes β€” works as a standalone station or teacher-led activity

1

Position Your Device

Set a laptop or tablet on a table or chair at roughly hip-to-chest height. The camera needs a clear side-on view of the thrower from head to toe β€” side-on is essential so the arm cock, elbow height, and follow-through are all visible. Avoid placing the device directly in the ball’s flight path.

πŸ’‘ Landscape orientation only

2

Set the Throwing Arm

Before the first student steps up, tap RIGHT or LEFT in the header to match their throwing hand. The on-screen skeleton will highlight the correct arm in cyan so you can confirm it’s tracking the right side.

πŸ’‘ Change this between students β€” it takes one tap

3

Wait for Pose Engine & Check the Skeleton

After opening the tool and allowing camera access, wait for ● POSE ONLINE to appear in the header. You’ll then see a white skeleton overlaid on the student’s body β€” this confirms they are being detected. The READY button unlocks automatically once the engine is live.

πŸ’‘ First load takes ~10–15 seconds

4

Student Gets in Position

The student stands sideways to the camera β€” throwing shoulder closest to the lens β€” on the foot guide shown on screen. Their full body from feet to raised hand should be visible. The guide disappears once the assessment starts.

πŸ’‘ 6–8 feet from camera works well for most students

5

Press READY & Throw on Cue

Press the READY button to begin the 3-2-1 countdown with audio beeps. On GO! the student performs an overhand throw. The tool records 4 seconds of movement from that moment β€” no ball is needed, the motion alone is assessed.

πŸ’‘ No ball required β€” the throwing motion is all that matters

6

Review the Instant Replay

The video plays back at 50% speed automatically. The checklist shows each element as green βœ“ or red βœ—. Each check requires 5 consecutive frames of correct form β€” a brief flash of good position won’t trigger a tick, encouraging students to hold their technique throughout the movement.

πŸ’‘ Press TRY AGAIN to immediately attempt another rep

Scoring & Ratings

Score out of 4 β€” each check worth 1 point

4/4
πŸ† Superstar Thrower!
Perfect technique across all 4 elements

3
⚑ Awesome Form!
Strong technique with one element to refine

2
πŸŒ€ Getting Better!
Developing β€” key elements beginning to show

0–1
πŸ’Ύ Keep Practicing!
Technique needs more work β€” use the replay to spot gaps

πŸ’‘ Teacher Tips

  • πŸ”„ Run as a station β€” one device handles a rotation of 4–6 students while others practise at separate throwing stations
  • πŸ“Ί Connect to a TV or large monitor so the group can watch the slow-motion replay together and discuss what they notice
  • 🎯 No ball is needed for the assessment β€” students perform the throwing motion only, making it safer and simpler to set up indoors
  • πŸ”’ Use the score as a simple pre/post benchmark across a unit β€” three attempts per student gives a clear picture of progress
  • πŸ‘Ÿ Remind students to stand sideways to the camera β€” this single adjustment makes the biggest difference to detection accuracy
  • β˜€οΈ Avoid direct sunlight behind the student β€” consistent, even lighting gives the pose engine the best chance of detecting all body points
  • πŸ”‹ Keep the device plugged in β€” pose detection is CPU intensive and will drain battery quickly during a full lesson

Launch THROW IT 5000

Opens in a new tab β€” allow camera access and select your throwing arm to begin.

Bowling Scoreboard with Lane Remote


Cosmic Bowling β€” User Guide

πŸ“Ί Projector Display
⚑ Real-Time Sync
🎳 Bowling

COSMIC BOWLING 🎳

A real-time bowling scoreboard built for elementary PE β€” project the cosmic-themed scoreboard on the wall while students enter their own scores from any Chromebook, iPad, or phone. Up to 12 lanes with multiple players each, a top-scores leaderboard, and CSV roster import for instant class setup.

🎳
Bowling
🀝
Turn-Taking
πŸ“±
Multi-Device
πŸ†
Live Scores

How to Use

  • πŸ“Ί Open the scoreboard on a laptop connected to the projector
  • πŸ“± A QR code appears in the bottom-right corner
  • πŸ‘Ÿ Students scan the QR with a Chromebook or iPad
  • 🎯 Each device picks a lane from the chip bar
  • πŸ‘₯ Add multiple bowlers per lane and tap names to switch turns
  • 🎳 Tap the pin count after each roll β€” strike, spare, or numbered pins
  • ✨ Scores sync instantly to the projector
  • πŸ† Top scores show live on the leaderboard at the top
  • πŸ“€ Export the entire class scoresheet to CSV when finished

See It In Action

Watch how Cosmic Bowling runs in a real PE class


β–Ά Demo Video

What’s Built In

Every feature designed to keep elementary PE classes moving β€” no laptops needed at each lane

🎳

Up to 12 Lanes

Add or remove lanes on the fly. Each lane gets its own neon color, scorecard, and player roster β€” perfect for whole-class rotations.

Add or Remove Live

πŸ‘₯

Multiple Bowlers Per Lane

Each lane supports unlimited players with their own scorecards. Only the active bowler shows on the scoreboard β€” the queue waits its turn.

Active Player Highlighted

πŸ“±

QR Code Connection

Students scan a single QR code on any device. Lane controllers open instantly and stay in sync β€” no app, no login, no setup time.

Works on Any Device

πŸ†

Top Scores Leaderboard

A live leaderboard shows the top 8 scores across all lanes with medals for the top 3. Toggle on or off with one click.

Live Across All Lanes

πŸ“₯

CSV Roster Import

Pre-load your class roster from a CSV file. Lanes and student names populate instantly β€” no typing during class time.

Bulk Class Setup

πŸ“€

Score Export

Export every player’s complete scorecard β€” frame-by-frame totals β€” as a CSV file for assessment records or family communication.

Frame-by-Frame Data

✨

Cosmic Theme

An animated starfield, neon glow effects, and a space-arcade vibe make the scoreboard feel like a real cosmic bowling alley on the gym wall.

Engaging Visual Design

πŸ“

Editable I Can Statement

Display a customizable PE learning target right at the top of the scoreboard β€” defaults to a turn-taking goal, edit to fit your lesson.

PE Standards-Aligned

Setup Guide

From cold start to first roll in under 5 minutes

1

Open the Scoreboard on the Projector

Connect a laptop to your projector or wall-mounted TV. Open Cosmic Bowling β€” a unique room code and QR appear in the bottom-right corner. Use the toolbar to set your alley name, edit the I Can statement, and add or remove lanes to match your class size.

πŸ’‘ Maximize the browser to fill the screen

2

Import Your Class Roster (Optional)

Click πŸ“„ Blank Template to download a CSV file pre-formatted with lane numbers. Open it in Excel or Google Sheets, type student names next to their assigned lane, save as CSV, then click πŸ“₯ Import CSV to load the whole class at once.

πŸ’‘ Lanes without student names auto-fill as “Bowler”

3

Distribute Devices to Each Lane

Hand a Chromebook, iPad, or phone to each lane. Students scan the QR code on the projector β€” the lane controller opens instantly. They tap their lane number from the chip bar at the top, then tap their name to switch between bowlers in that lane.

πŸ’‘ One device can control all lanes if needed

4

Bowl & Score in Real Time

After each roll, the active bowler taps the pin count β€” strike (full-width pink button), spare (auto-detected), or numbered pins. The scoreboard on the wall updates within a second. Tap Next β†’ to pass the turn to the next bowler in the lane.

πŸ’‘ Undo button fixes any miscount

5

Check the Leaderboard & Export

The πŸ† Top Scores bar shows the highest scores across the whole class β€” toggle it on or off as a motivator or to keep focus on form. When the unit is done, click πŸ“€ Export Scores to download a complete CSV scoresheet for assessment records.

πŸ’‘ Reset All Scores starts fresh without losing the roster

Roster & Score Files

Three buttons in the toolbar handle all class data β€” pre-load students, save scores, share with parents

πŸ“„

Blank Template

Downloads a pre-formatted CSV with lane numbers 1–12 and 4 blank rows per lane. Add student names next to their lane and save.

πŸ“₯

Import CSV

Loads your filled-in roster file. Lanes are created automatically based on the lane numbers in the CSV β€” empty rows become “Bowler”.

πŸ“€

Export Scores

Saves a complete CSV with every player’s name, lane, frame-by-frame cumulative scores, and final score. Date and alley name auto-included in filename.

Bowling Scoring

Standard 10-frame bowling β€” strikes, spares, and bonus rolls all calculated automatically

300
πŸ† Perfect Game!
12 strikes in a row β€” the cosmic dream

200+
⚑ Stellar Bowler
Strong frame-by-frame consistency

100+
πŸŒ€ Solid Roll
Great average for elementary players

<100
πŸ’Ύ Keep Rolling!
Every frame is a fresh chance to strike

πŸ’‘ Teacher Tips

  • πŸ“‹ Pre-import your class roster the night before β€” students walk in and start bowling immediately
  • πŸ‘₯ Add 4–6 students per lane and have them rotate naturally β€” the active bowler is always highlighted on the projector
  • πŸ”‡ Toggle the leaderboard OFF if competition becomes a distraction, then back ON to celebrate top scorers at the end
  • 🎯 Use the I Can statement to anchor each lesson β€” turn-taking, encouragement, accurate scoring, or proper form
  • πŸ”‹ Keep the projector laptop plugged in β€” the live sync runs continuously and uses some battery
  • πŸ“‘ Make sure all devices are on the same WiFi β€” school networks work fine, no special setup needed
  • πŸ“Š Export scores as a benchmark at the start of the unit, then again at the end to show student growth

Launch Cosmic Bowling

Opens in a new tab β€” connect a projector for the full experience.

Volleyball Pass

BUMPTRON 5000 β€” User Guide
πŸ“· Webcam Required ⚑ AI Powered 🏐 Volleyball

BUMPTRON 5000 🏐

A volleyball passing assessment tool that uses your webcam to automatically analyse a player’s forearm pass technique in real time. A partner tosses on command, the player passes, and an instant slow-motion replay shows exactly which platform and body-position skills were detected.

🏐
Passing
πŸ’ͺ
Platform
πŸ€–
Auto-Assess
πŸ“Ή
Replay

How to Use

  • πŸ’» Open BUMPTRON 5000 on a laptop or tablet
  • πŸ“· Allow webcam access when prompted
  • 🟒 Wait for POSE ONLINE to appear in the header
  • πŸ‘Ÿ Player stands in frame facing the camera
  • ▢️ Player presses READY to begin the countdown
  • 🏐 Partner tosses ball on the TOSS! cue
  • 🎬 4.5-second recording captures the pass attempt
  • πŸ“Ί 50% slow-motion replay plays automatically
  • βœ… Checklist lights up for each passing skill detected

See It In Action

Watch how BUMPTRON 5000 works in a real PE setting

β–Ά Demo Video

What Gets Assessed

7 passing technique elements are automatically detected using pose landmarks β€” no teacher input needed

🦡

Knees Bent

Both knees must show an athletic bend to create a strong, balanced passing base rather than standing tall and stiff.

Knee Angle < 155Β°
πŸ‘Ÿ

Feet Width

Ankles should be at least shoulder-width apart to give the passer a stable base and better lateral balance.

Ankle Width vs Hip Width
↗️

Forward Lean

The body should be in a forward athletic posture with hips dropped and chest leaning into the pass rather than upright.

Hip + Knee Position
πŸ’ͺ

Elbows Locked

Both arms should be fully extended to form a clean passing platform instead of a broken or bent platform.

Elbow Angle > 155Β°
🀝

Arms Together

Wrists and forearms should stay close together to create one flat passing surface and reduce ball spray.

Wrist Distance
⬇️

Low Position

The hips should drop into a lower passing position at contact instead of reaching high from a tall stance.

Hip Height Threshold
⚑

Weight Forward

The platform should be out in front of the body so the passer moves through the ball instead of leaning backward.

Wrist Midpoint vs Body Center

Setup Guide

Get up and running in under 3 minutes

1

Position Your Device

Place a laptop or tablet on a chair, table, or stand at about player hip-to-chest height. The camera should capture the player from head to toe with enough space to see the passing platform clearly.

πŸ’‘ Landscape orientation only
2

Wait for Pose Engine

After opening the tool and allowing camera access, wait for the ● POSE ONLINE indicator to appear in the top header. This confirms MediaPipe has loaded and is tracking landmarks correctly. The READY button unlocks automatically.

πŸ’‘ First load may take 10–15 seconds
3

Player Gets in Frame

The player stands on the foot guide shown on screen, facing the camera. Their full body should be visible, including both feet and both arms forming the platform. The guide disappears once the assessment begins.

πŸ’‘ Player should stand 6–8 feet from the camera
4

Press READY & Toss on Cue

Player or teacher presses READY. A 3-2-1 countdown begins with sound cues. On TOSS! the partner tosses the ball and the player performs the forearm pass. The tool records 4.5 seconds from that moment.

πŸ’‘ Partner should toss from the side, not directly in front of the camera
5

Review the Instant Replay

After the recording ends, the replay automatically runs at 50% speed. The checklist panel shows which passing skills were detected. Each skill must appear for 4 consecutive frames, so a lucky moment will not earn a check by itself.

πŸ’‘ Press TRY AGAIN to repeat the rep immediately

Scoring & Ratings

Score out of 7 β€” each check worth 1 point

7/7
πŸ† Totally Radical!
Perfect passing technique across all 7 elements
5–6
⚑ Gnarly Form!
Strong passing form with minor gaps
3–4
πŸŒ€ Getting Tubular!
Developing platform and posture are showing up
0–2
πŸ’Ύ Keep Practicing!
Technique needs more work β€” use the replay to spot what to fix

πŸ’‘ Teacher Tips

  • πŸ”„ Use it in a station rotation β€” one device can serve a small passing group while others do wall reps or partner passing
  • πŸ“Ί Project the replay onto a TV or monitor so students can self-coach by watching the checklist and slow motion
  • 🎯 Have students complete 3 attempts and try to improve their score from rep to rep
  • πŸ‘₯ Assign one student as tosser and one as passer so both roles stay active and focused
  • β˜€οΈ Avoid strong backlighting or sunlight behind the player β€” it can reduce pose accuracy
  • πŸ”‹ Keep the device plugged in during class β€” webcam plus pose detection can drain battery quickly

Launch BUMPTRON 5000

Opens in a new tab β€” allow camera access to begin.

Volleyball Set

SET IT 5000 β€” User Guide
πŸ“· Webcam Required ⚑ AI Powered 🏐 Volleyball

SET IT 5000 🏐

A volleyball setting assessment tool that uses your webcam and pose detection to automatically analyse a player’s setting technique in real time. Partner tosses on command, the player sets β€” then an instant slow-motion replay shows exactly what they nailed.

πŸ™Œ
Setting
πŸ“
Technique
πŸ€–
Auto-Assess
πŸ“Ή
Replay

How to Use

  • πŸ’» Open SET IT 5000 on a laptop or tablet
  • πŸ“· Allow webcam access when prompted
  • 🟒 Wait for POSE ONLINE to appear in the header
  • πŸ‘Ÿ Player stands in frame facing the camera
  • ▢️ Player presses READY to start countdown
  • 🏐 Partner tosses ball on TOSS! cue
  • 🎬 4-second recording captures the set attempt
  • πŸ“Ί 50% slow-motion replay plays automatically
  • βœ… Checklist lights up green for each skill detected

See It In Action

Watch how SET IT 5000 works in a real PE setting

β–Ά Demo Video

What Gets Assessed

5 technique elements are automatically detected using pose landmarks β€” no teacher input needed

πŸ‘Ÿ

Feet Width

Ankles must be at least shoulder-width apart β€” the foundation of a stable setting platform.

Ankle vs Hip Width
πŸ”Ό

Elbows Up

Both elbows must rise above shoulder height β€” getting arms into the setter’s window above the forehead.

Elbow Y vs Shoulder Y
πŸ™Œ

Hands High

Both wrists must reach above the nose/forehead at the point of contact β€” correct contact height.

Wrist Y vs Nose Y
πŸ’ͺ

Elbow Bend

Elbow angle must fall between 55Β° and 130Β° β€” the setter’s triangle shape, not straight arms.

Joint Angle 55–130Β°
βš–οΈ

Arms Symmetric

Both elbows must be at a similar height β€” balanced arms for a clean, controlled set direction.

Left vs Right Elbow

Setup Guide

Get up and running in under 3 minutes

1

Position Your Device

Place a laptop or tablet on a table or chair at roughly player hip-to-chest height. The camera should have a clear view of the player from head to toe. A side-on or slight angle works best β€” avoid directly behind or in front of the ball path.

πŸ’‘ Landscape orientation only
2

Wait for Pose Engine

After opening the tool and allowing camera access, wait for the ● POSE ONLINE indicator to appear in the top header. This confirms MediaPipe has loaded and is actively detecting body landmarks. The READY button will unlock automatically.

πŸ’‘ First load takes ~10–15 seconds
3

Player Gets in Frame

The player stands on the foot guide shown on screen, facing the camera. Their full body β€” feet to hands raised overhead β€” should be visible. The foot guide disappears once the assessment starts.

πŸ’‘ Player should be 6–8 feet from camera
4

Press READY & Toss on Cue

Player (or teacher) presses the READY button. A 3-2-1 countdown begins with audio beeps. On TOSS! the partner tosses the ball and the player sets. The tool records 4.5 seconds from that moment.

πŸ’‘ Partner should toss from the side, not between camera and player
5

Review the Instant Replay

After recording, the video plays back automatically at 50% speed. The checklist on the right shows each skill as green βœ“ or red βœ—. Each check requires 4 consecutive frames of good form β€” so a flash or fluke won’t earn a tick.

πŸ’‘ Press TRY AGAIN to immediately attempt another rep

Scoring & Ratings

Score out of 5 β€” each check worth 1 point

5/5
πŸ† Totally Radical!
Perfect technique across all 5 elements
3–4
⚑ Gnarly Form!
Strong technique with minor gaps
2
πŸŒ€ Getting Tubular!
Developing β€” key elements showing
0–1
πŸ’Ύ Keep Practicing!
Technique needs more work β€” use replay to identify gaps

πŸ’‘ Teacher Tips

  • πŸ”„ Run in a station rotation β€” one device serves 4–6 students at a time while others drill separately
  • πŸ“Ί Connect to a TV or monitor so the whole group can watch the replay together and self-coach
  • 🎯 Challenge students to improve their score across 3 attempts β€” use the score as a pre/post skill benchmark
  • πŸ‘₯ Pair stronger and developing setters together β€” the partner toss role still builds anticipation and teamwork
  • β˜€οΈ Avoid direct sunlight behind the player β€” it confuses the pose engine. Consistent background works best
  • πŸ”‹ Keep the device plugged in β€” MediaPipe is CPU intensive and drains battery quickly

Launch SET IT 5000

Opens in a new tab β€” allow camera access to begin.

Lap Counter

Free πŸ“· Teacher Tool ● Live Now

Webcam Lap Counter πŸ‘Ÿ

Track laps in PE with a webcam-based QR scanner built for teachers. Add students, generate their QR codes, and scan each code as they pass to log laps instantly. It is fast, organized, and perfect for walking, jogging, running, and endurance activities.

πŸ“· Webcam QR scanning β€” use your device camera to scan student QR codes and record laps in real time.
πŸ‘Ÿ Instant lap tracking β€” every successful scan adds a lap automatically so you do not have to count by hand.
πŸ§‘β€πŸŽ“ Student roster tools β€” add students one at a time or import a class list from CSV to get set up quickly.
πŸ† Live leaderboard β€” show rankings during class to keep students motivated and engaged.
πŸ–¨οΈ Printable QR sheets β€” generate a QR code for every student so they can scan and log laps during the activity.
πŸ“Š Easy exports β€” download lap data as a CSV or save the full session to continue later.

How to Use It

  1. Add students manually or import your class list with a CSV file
  2. Generate and print each student’s QR code
  3. Open the scanner tab and allow camera access
  4. Set your device where students can quickly scan as they pass
  5. Each time a student completes a lap, scan their QR code
  6. The tool records the lap automatically and updates the leaderboard
  7. Use the export tools to download CSV results or print QR sheets
  8. Save the session if you want to continue later

Launch Lap Counter

Opens in a new tab β€” webcam ready and perfect for lap tracking days.

🎯
Why Use a Lap Counter?
It makes lap tracking faster, easier, and more accurate during walking and running activities so teachers can focus on instruction instead of manual counting.
πŸ“‹
Built for Class Management
Create student rosters, print QR codes, and organize lap days with tools designed specifically for PE teachers and large groups.
πŸƒ
Perfect for Endurance Activities
Use it for jog-a-thons, pacer alternatives, lap challenges, walking clubs, mileage goals, and class fitness events.
πŸ’Ύ
Save and Export Data
Download results as a spreadsheet, save your session, or restore later so your data stays organized and easy to manage.

⌨ Tool Highlights

CSVImport student rosters fast
QRPrint student scan cards
JSONSave and restore sessions

Push Up Counter

Free πŸ’ͺ Teacher Tool ● Live Now

Push-Up Counter πŸ’ͺ

Turn a webcam into an instant push-up counter for PE class, fitness stations, and personal challenges. Students perform push-ups in front of the camera, and the tool automatically counts each rep in real time to make fitness tracking simple, motivating, and fun.

πŸ“· Webcam-based rep counting β€” uses the camera to detect movement and count push-ups automatically right in the browser.
πŸ”’ Live push-up total β€” students can see their count update instantly as they complete each correct rep.
⚑ Fast station setup β€” open the tool, allow camera access, and start counting without clipboards or manual tally marks.
πŸ‹οΈ Perfect for fitness testing β€” use it during fitness units, challenge days, or personal best activities to make counting easier and more accurate.
🎯 Motivates students β€” seeing the number rise in real time adds energy, effort, and focus during push-up practice.
πŸ“Ί Works on classroom devices β€” run it on a laptop, tablet, or projected screen for individual use, partner work, or stations.

How to Use It

  1. Open the tool on your device and allow camera access
  2. Place the camera where the student’s full push-up movement can be seen clearly
  3. Have the student get into push-up position in view of the camera
  4. Press START to begin counting
  5. Students complete push-ups while the tool tracks each rep
  6. Watch the live total update on screen in real time
  7. Use the final number for challenges, stations, or fitness tracking
  8. Reset and repeat for the next student

Launch Push-Up Counter

Opens in a new tab β€” webcam ready and built for fitness stations.

πŸ’ͺ
Why Use a Push-Up Counter?
Automatic counting saves time, reduces teacher guesswork, and lets students focus on effort and form instead of keeping track of reps.
πŸ“ˆ
Great for Fitness Units
Use it for fitness stations, classroom challenges, strength tracking, or personal-best days to make push-up practice more organized and engaging.
πŸ§’
Encourages Effort
Students love seeing the number go up live. It adds motivation and gives them a clear goal to work toward during each attempt.
πŸ‘©β€πŸ«
Built for PE Teachers
Simple browser-based setup makes it easy to use in PE without extra equipment, special apps, or complicated directions.

⌨ Keyboard Shortcuts

SpaceStart / Pause
RReset Counter
FToggle fullscreen